How to Roll Out Expensify Company Wide

You have decided to move forward with Expensify, now what? Below are a few suggestions to ensure a smooth roll out.
Step 1: Add a Billing Card
After your 30 day trial, the Policy Owner will need to add a billing card to keep the account live. To do this, the Policy Owner needs to login to the Expensify website and navigate to Settings > Account > Payments to add the card.
Step 2: Send Out an Internal Email (optional)
This should be done 1-2 days prior to inviting your employees.
To roll out company wide, you will want to invite the remaining users. Keep in mind when you invite a user to Expensify, it will send them an email to start using Expensify immediately. Many companies prefer sending out an internal email a couple days prior to rolling out. Below is a quick sample email you can send out:
Hey Team,
We are moving to Expensify for all of our expense reports. Expensify is an easy to use expense mobile app, where you simply SmartScan a receipt and the rest is automated! You will use Expensify for your company card expenses and any out of pocket expenses. Here is a quick overview on how it works.
You will receive an email in the next day from Expensify asking you to validate your account to setup a password. Please be sure to check your spam folder if you do not see it in your inbox. Once you setup your password, please download the mobile app. You can find it in the Google Play or App Store. Happy Expensifying!
We will be holding a quick company training on X day. If you have anymore questions, please reach out to their great support team at concierge@expensify.com.
Thanks,
Admin Team
Step 3: Invite the Remaining Employees
If you decide to send the email, the next step is to invite the employees. You do this by navigating to Settings > Policies > Group > [Policy Name] > People.
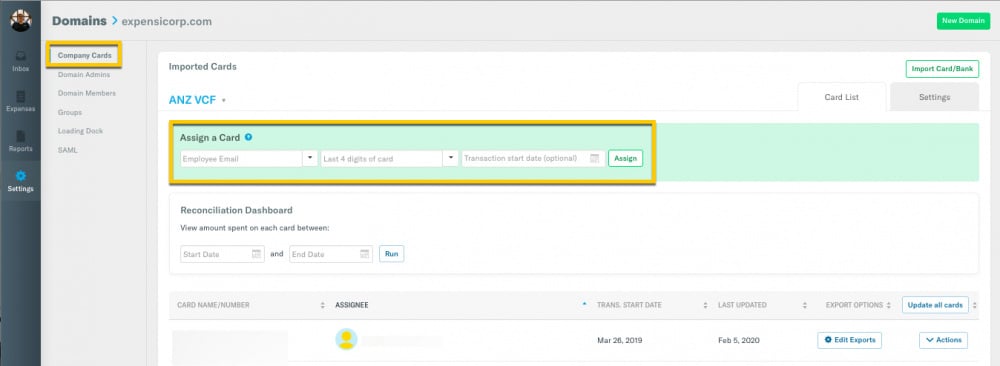
If you have company cards, you need to go to Settings > Domain Control > Company Cards and assign the cards to the new users. Be sure you note the transactions start date to ensure a clean start of when the transactions start populating in Expensify.
Step 4: Hold a Company Training
The company training should be done 1-2 days after you have invited the employees to the policy.
This will give your employees ample time to set up a password and download the app. The important thing is that they can come with questions, or have at least opened the app. Expensify is made to be extremely user friendly, as soon as they see the app they will get excited for how simple expense reporting will be moving forward!
What should I include in my training?
You have all the tools you need to run this training. Walk your employees through using the mobile app — it's what they will be using the most. Below are some key points to hit during the training.
Mobile App — Download the mobile app
- Inbox — The Inbox is the page you are taken to when you first open the app. This is a checklist of expense you need to fix in order for your report to be submitted.
- Smart Scan — Show them how to use SmartScan. The best way to use SmartScan is to take a picture of the receipt as soon as they get it, and come back to Expensify later. Expensify is smart enough to know if that receipt is an out of pocket expense or should match their linked credit card. Simply, snap the picture and Expensify will do the work of creating the expense and matching it to the correct report! Key take away-once you SmartScan the receipt, you can close the app and it will continue to work-you never wait for it.
- Remind them they can forward in receipts directly from their email to receipts@expensify.com. Other ways to upload receipts can be found here.
- Mileage — Mileage tracking information can be found here.
- Trips — Do you have a lot of travelers? Show them Trips and how to use offline mode!
How to submit a report — How do you submit a report
If Scheduled Submit is turned on: Users will have their out of pocket expenses automatically grouped by the time frame you have set and automatically submitted-If they are violation free. (Recommended workflow.)
If Scheduled Submit is off: Users will have to submit their report when they want to get reimbursed for any out of pocket expense.


